
Destiny 2’s Leviathan raid is its most punishing challenge; a sequence of four trials, followed up by a boss, that will force you to put all of your Destiny 2 skills to work. Heavily focused on puzzles and enemy management, it does little to explain itself, and as such requires patience to succeed, especially during your first run. That’s why we’ve put together this Destiny 2 Leviathan raid guide.
We’ve seen all four challenges on regular and Prestige mode, and thus are pleased to present our complete and comprehensive guide to the Leviathan raid – Destiny 2’s ultimate PvE enterprise. Herein you’ll find breakdowns and strategies for every encounter, on normal, Prestige, and Challenge modes.
Raids are a core component of the PC’s very best MMO games.
The raid has a power range of 260-280, but it recommends at least 270. For the best advice on how to gear up, see our Destiny 2 leveling guide.
When you’ve completed the campaign and reached the minimum required power level, you’ll be able to access the raid from the Director. You’re off for an audience with Calus, the former Emperor of the Cabal, whom Ghaul overthrew. He’s grateful for what you did in the campaign and wants to reward you, but first, you face a number of trials..
Leviathan raid Castellum
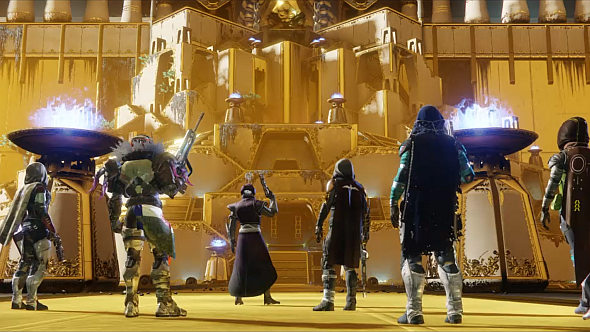
The Castellum is the courtyard of Calus’s ostentatious golden palace, and connects its four different trials. Access to each trial is behind a door in the Castellum, which you’ll need to unlock – the method is the same every time.
The four doors are each marked with one of the sigils that recur throughout the raid. The Royal Pools are behind the Sun door, the Pleasure Gardens are behind the Dog, the Gauntlet is behind the crossed Axes, and Calus himself is behind the Chalice. Each door has a triangular plate in front of it – look for the one with the ghostly outline of another sigil floating above it. This is the door you have to unlock. Calus is always last, but the order of the other three trials changes each week.
You unlock doors by placing three banners into the plates, and their ghostly outlines indicate which you need next. For the Sun door, the Dog bannershouldbe the first one you need, followed by the Axes and the Chalice.
Banners are carried by Standard Bearers – marked Cabal who will spawn at the plate whose banner you need. The Standard Bearer who spawns near the Chalice plate will drop the Chalice banner, for instance, but he’ll only appearwhenyou need the Chalice banner. Look around the arena and make a mental note of each door and its sigil.
There are two complications. When you’ve placed a banner, Standard Liberators will spawn – they will reclaim banners if you let them reach the plate. Then there are the Councillors: special Psions who can protect Liberators with invulnerable shields. You’ll be notified when a Councillor has spawned, at which point youneedto find and kill them. They’re easy to spot, floating in their little bubbles, and they die easily.
Destiny 2 Castellum strategy:
- Start at the plate and split into two teams. One team defends, the other goes to get the current standard. A three-three or four-two split (with four on defence) is advised.
- Standard Bearers are tough, so splash your Super and power ammo. It’s easy to stay alive if you’re running about, so once the standard bearer is down, just send a solo runner to bring it back to the plate (invisibility through Vanish in Smoke or Rat King can help, if you’re struggling).
- The remaining member(s) of the banner team should be roughly equidistant between the next two spawns so as to get to the next banner promptly. Once the runner has put the first banner in the plate, the next one you need will be revealed, so call it out.
- All this time, the plate team are getting swarmed by adds, but three people should be enough to handle it. Orb-generating and add-clearing Supers are recommended here, as are Warlock rifts for healing. Prioritise the standard liberators, and don’t be afraid to bring out the big guns if they get too close.
- Once the first banner is in the plate, Councillors will spawn around the door you’re trying to unlock. The defending team should deal with them as and when you’re told they appear – call out if necessary, to make sure someone’s on it.
- The banner team now go to kill the next standard bearer – send another runner from the defence team to help, if necessary. It might be a good idea to send someone who has a Super or lots of power ammo. A runner brings the banner back to the plate while the standard team moves on to the last sigil. Repeat one more time and you’re done.
Leviathan raid: Royal Pools
There are five plates – four surrounding one in the central bath house. Each has a charge of 60 seconds of psionic protection on it, all of which will respawn quickly as long as you’re not on the plate. Without psionic protection, the water in the baths will damage you. There are also three sets of three purple censers on chains in the bath house; your goal is to destroy all nine censers, but they’re invulnerable, at first.
You can expose them by standing on the four outer plates for long enough. You’ll know you’re making progress because the chains at each outer plate will slow and eventually stop, whereas they’ll gradually reset whenever you’renoton the corresponding plate. The damage phase begins when all four chains are stopped, which is signalled by a bell toll and locks engaging on each chain. A Force of Will buff will then appear on the central plate, which enables you to damage the censers.
Staying alive on the plates is the challenge, given the toxic water, and the regular appearance of powerful Gladiator reskins named Bathers. Also, your revives are limited, and if you leave anyone dead for 25 seconds, you all wipe. (This restriction is applied in each of the raid’s following arenas. Yeah.)
The solution is to use the psionic protection at the central plate and rotate it through the team, to ensure everyone stays protected and everyone has help killing Bathers.
Destiny 2 Royal Pools strategy:
- Four players begin at each of the four outer plates. The two remaining players start in the bath house, and take a pair of the outer plates each. Let’s say A takes plates 1 and 2, and B takes plates 3 and 4.
- Begin the encounter by jumping on your plates and taking the first psionic protection.
- A takes the central psionic protection and carries it to plate 1. It will respawn in a couple of seconds, at which point B should take it and carry it to plate 3. Bather spawns are staggered, so let plates 1 and 3 be the ones where they appear first – these are the two ‘upper’ plates, furthest from the arena entrance. A and B should go here first to help the players on those plates kill their Bathers.
- When the Bathers are dead, the players replaced by A and B at plates 1 and 3 will go take the central psionic protection, and carry it to plates 2 and 4. They should arrive just in time to help kill the Bathers there. When that’s done, the playerstheyreplace go take the protection back to plates 1 and 3, where they replace A and B again.
- Continue the cycle until all four chains are locked and the bell tolls.
- Everyone now goes to the central plate to either DPS the censers or clear adds. Add control as important, as there are Bathers among them. Strikers and Stormcallers are good for add control, Mercilesses, Coldhearts, and Voidwalkers are good for nuking the censers, and Nightstalkers and Gunslingers should be able to generate enough orbs to get everyone a new Super as soon as their first is done.
- After Force of Will expires and the damage phase ends, Projections will appear inside bubbles – they look like the Councillors from the Castellum. Leave them alive too long and they’ll wipe your whole team, so kill them quickly – you should be able to just shoot these ones, rather than having to melee them.
- It’s quite possible to do this in just one cycle, but don’t worry if you don’t – just reset and repeat the steps above to trigger another damage phase. Don’t taketoolong, though,as there’s an enrage mode – if you see the message ‘Pools of Sol corrupted’, you’re about to be wiped. Two phases should be plenty.
One or two deaths in the damage phase is forgivable, but dying while in the plate phase is not – you’ll lose almost all progress on two chains while someone else comes to pick you up. It’s far better to step off your plate momentarily, perhaps to get away from a Bather, if it keeps you alive.
Destiny 2 Royal Pools Prestige mode

Prestige mode cranks up enemy health and damage across the board, with recommended power levels set at 300. Since the Royal Pools is much more about add control than any other encounter, the difference is most keenly felt here – you’ll have to bemuchstronger to stay alive now.
Prestige mode does add a couple of other wrinkles to each encounter. In the Royal Pools, Bathers are replaced by Oiled Bathers. Besides being (even) tougher, they will drop an area-of-effect pool that, if you stand in it, will remove five ticks of your psionic protection per second rather than just one. There are also a ton more adds to handle in the damage phase.
Finally, at the end of the damage phase, a few (apparently random) members of the team will get the ‘Burden of Worthiness’ debuff. The should look to the central plate: they will each see a sigil projected above it. They need to go to the outer plate marked by this sigil and take the psionic protection there to cleanse themselves – if they take the orb at any other plate, they die.
Destiny 2 Royal Pools Challenge
The Royal Pools challenge is to complete the encounter with someone in the water of the central bath houseat all times.Their feet can’t even leave the floor, so no jumping.
The simplest way to do this is just nominate one player to stay in the water. The challenge for them is to stay alive – we suggest a Voidlock with high power who’s good at managing healing rifts and the Devour ability.
The challenge for the rest of you is completing the encounter with only five players in the rotation. Follow the strategy above, with the following adjustments:
- It’s no longer two plates between two teams of three, but four plates between a team of five.
- Whenever you’re replaced on a plate, just rotate one plate clockwise.
- You need to be faster, since whomever has been on their plate the longest is at risk of running out of Psionic protection entirely.
- You’ll need to be able to handle a Bather solo at least once. Merciless and swords are your friends.
- It’s even more important that you don’t die.
- Remember that the central psionic protection stops spawning for a short while at the end of each damage phase. If you don’t destroy the censers in one phase, the central player is going to find it very tough to stay alive until the chains phase starts again. Hence the Voidlock recommendation.
When you’re done, you’ll get a chest with some Calus tokens and a chance at raid gear, plus a random key to one of the chests in the Leviathan’s underbelly. If you’ve done the challenge, you’ll get a second chest that guarantees a piece of raid gear.
Youcanreturn to the Castellum to unlock the door to the next arena, or you can open the shortcut into the Leviathan’s underbelly. The switches are in the right-hand half of the arena – look on the walls for levers disguised as Cabal worms (or elephant trunks). You have to pull these in a sequence – if you flip the correct one, it will stay down for longer than the others, while an incorrect choice will reset them all. There are levers like this near all the raid arenas.
If you find the right sequence, you’ll see a message saying ‘the way is opened’. Look at the grates near the top-right plate that have been venting purple steam. Now look for the one thatisn’tventing.
Leviathan raid: Pleasure Gardens

Dogs and beast handlers roam the gardens. Kill them all to spawn a pair of prisms on top of a large, grey vault. This vault is the safe room. The encounter begins when two players grab the prisms.Sixmuchtougher dogs named Royal Beasts are released into the garden, and the trapdoor atop the safe room opens. Your ultimate goal is to kill all six superdogs.
The four players who aren’t carrying prisms can each claim an orb of Royal Pollen from the safe room. There are eight flowers dotted around the gardens, two of which will give off a purple glow (we’ll call this ‘blooming’). The prism carriers should note the pools of golden light shining on the rocks – stand in one, and you’ll be able to fire a beam of light with your prism. This also gives you a much better view of the arena than the pollenators get, so it’s up to you to call out which flowers are blooming and direct them there safely.
Pollenators should gather around a flower when it’s in bloom, and a prism carrier should fire their laser at it. This will cause it to release empowering spores, which will boost your damage. All four pollenators should be close to the flower when it’s fried, to ensure you gather the maximum number of spores per flower, which is 12. If you stay near a flower for too long without getting it fried, it will stop blooming, wasting time.
After a flower is zapped, two more beast handlers will appear from doors in the sides of the chamber.Prism carriers should watch for these and kill them, because they can wreck the pollenators if they get into the garden. They are, however, your only source of power ammo once the encounter gets started.
You have limited time for your spore-gathering phase – a message saying ‘the dogs are growing restless’ will warn you when it’s nearly up. When it elapses, or if the dogs detect you, your pollens and prisms are forcibly dropped and your guns pop up. This is your damage phase, and it lasts for 30 seconds, after which the room is flooded with gas and you wipe. The safe room is your only escape, and Emperor Calus only lets you use it three times, for a total of four damage phases.
Your task, then, is for the pollenators to gather enough spores to hurt the dogs, and then to kill all six before the end of the fourth damage phase. You should also know that killing dogs will cause them to get restless much quicker, shortening your future gathering phases. If you’re not confident that you can killallthe dogs in your current phase, then you shouldn’t killany– just knock their health down a bit and try for more spores next time.
Good callouts and knowledge of the arena are key to this encounter. Here’s a quick explanation of one common convention: there are three flowers at the front, middle, and rear of the arena on each side. From front to back, they are L1, L2, and L3, and R1, R2, and R3 – L1, for instance, is just outside the left-hand door out of the safe room. There are also flowers in the two small caves in the centre of the arena – let’s call the right-hand one ‘Cave’ andthe left-hand one ‘Tree’, because of the big tree growing out of it.
In the damage phase, the six dogs will run to each of these flowersexceptL2 and Cave.
Destiny 2 Pleasure Gardens strategy
- Assign two players to be prism holders and one to lead the Pollenators around the garden – obviously, these should be the three who are most confident in their callouts and arena knowledge.
- The six dogs will go to L1, L3, Tree, R1, R2, and R3 in every damage phase – assign each of these six flowers to a different member of the team.
- The prism carriers should cover one half of the garden each. One flower on the left side and one flower on the right will bloom at the start of each gathering phase. Prism carriers should identify which flower is blooming on their side of the arena and call it out.
- The pollenators’ leader should decide which flower to go to first, using their knowledge of the garden to pick the quickest route. Prism carriers should warn them of nearby dogs. Everyone else should stay quiet and follow the leader closely.
- Pollenators follow their leader to the next flower and gather closely around. The nearest prism carrier zaps the flower and kills the beast handler. Repeat with the next flower. Two new flowers bloom.
- Repeat, gathering as many spores as possible.
- Time either elapses or you get spotted, and the damage phase begins. Everyone immediately goes to their assigned flowers.
- What you do now depends on how many spores you have – strong teams can kill all six dogs with 48 or even 36 spores, but if you’re not confident, there’s no shame in throwing a grenade and shooting for about ten seconds before returning to the safe room to reset and try again. If you’re not going for the kill, don’t linger – dying on top of the safe room is forgivable, but dying in the garden itself is tantamount to a wipe.
- If you’ve got 60 spores or more, go for the kill. Merciless, swords, and rocket launchers with cluster bombs are recommended, as are Supers and grenades. When you’ve finished your dog, ask if anyone needs help with theirs.
- Make sure no-one’s confused about the decision – the worst outcome is to kill a dog without completing the encounter.
Destiny 2 Pleasure Gardens Prestige Mode
Unlike the Royal Pools, Prestige mode adds a real wrinkle to the Pleasure Gardens in that there are noweightdogs – one for every single flower.
This makes moving around the garden undetected a lot harder, but unfortunately there’s not much we can say to help with that, and the basic strategy we outline above doesn’t change all that much. With recommended power up at 300 and more dogs in the garden, Prestige mode just means it’ll take you longer to gather spores, their damage modifier will be less impactful, and there are two dogs without players assigned to them that you’ll also need to kill.
Because of this last point in particular, you should spend a couple of phases whittling the first six dogs’ health down before you go for the kill. To be sure of victory with an average team, you’ll need a healthy stack of spores plus a decent headstart on the first six dogs.
Destiny 2 Pleasure Gardens Challenge
The Pleasure Gardens challenge stipulates that prism carriers can’t shoot more than one flower in each gathering phase. If they do, the challenge fails. This means you can’t ever get more than 24 spores per damage phase.
Quite obviously and simply, this makes the encounter all about whittling the dogs down rather than stacking up spores for one big nuke. Follow the strategy above, but let yourselves get spotted at 24 spores. Rush to the flowers ahead of the dogs and consider setting a stopwatch for 30 seconds to optimise your damage time (though remember you have to get back to the safe room).
This is a pretty harsh challenge that sets a hard cap on your DPS. In normal mode it’s not so bad if you’re at high power, have good guns, and can get 24 spores consistently (which most teams should be capable of), but in Prestige mode it’s a realpain.
Check the top of the safe room for the chest and key after you kill all six (or eight) hounds. After this, it’s back to the Castellum again or you can find the underbelly switches on the pipes just outside the room.
Leviathan raid: The Gauntlet
The arena has four plates marked by the raid sigils, and is encircled by a tunnel. The encounter begins when a player stands on each plate – adds will spawn, and then finally Centurions. Kill the Centurions to spawn psionic charges at the Hound and Chalice plates.
The two players not assigned to a plate should grab these charges, which will teleport them into the tunnel and begin a hidden countdown to the charge’s detonation. At each of the four plates, the tunnel is blocked by a grid of circular holes. The people in the room – let’s call them ‘shooters’ – can unlock these grids and spawn new charges to refresh the runners’ timer, preventing them from blowing up. The timer is slightlylonger than the optimal travel time between two grids, so if the runner is quick, they can make it if the shooters screw up.
Inside the room, there are three inverted triangles at each grid, which correspond to its three rows. To unlock the grid and spawn the charge, the shooters must shoot the arrows in the rows where the red holeisn’t.When the runner grabs the charge, a Projection Psion spawns beneath the three arrows – one of the shooters must kill it immediately, or it wipes everyone.
At the end of each runner’s lap is another charge that teleports them back into the room. They now dunk their charges in the recepticle at its centre – you want charges for everyone in the team here, so that means two more laps. When you have six charges stored, everyone should grab one and attempt a lap of the outer ring. This time, the grids are unlocked, and four charges will spawn randomly in their holes. Only three of you need to finish the lap (and dunk your charges again) to complete the encounter, but the death timer can still wipe you, so you can’t afford for anyone to die until one or two grids into the run.

Destiny 2 Gauntlet strategy:
- Assign four players to the plates and two as runners. The two runners start on the Hound and Chalice plates, meaning they can help with the Centurions, so put your best individual fighters on Sun and Axes.
- Assign each runner a pair of shooters. Their job is to get their runner through each grid by getting on the plate in time, shooting the correct triangles, and then killing the Psion before moving on.
- Start the encounter by standing on the plates. The charges will spawn when the Centurions are killed – the runners should grab one each and call out when they’re doing so, so their shooter team can get ready.
- One shooter stands on the plate the runner is about to approach. The other stands such that they’re able to get on thenextplate, while also able to shoot the triangles on thecurrentplate.
- Runners run clockwise around the outer tunnel. A shooter is on the next plate, so its grid is lit up, and the runner can call out which row contains the red circle. For example: “Axes, middle,” or “Chalice, top.” It may be helpful for shooters to mute the runner they’renotcovering.
- The two shooters shoot the triangles for theothertwo rows in the grid. One shooter can’t unlock both, so agree that one of you will always shoot the topmost, and the other will always shoot the bottom-most. If you hit the wrong triangles, the charge won’t spawn, so accuracy is important – scout rifles are recommended.
- The runner can now go through the hole and grab the charge. The shooter on the current platemustmelee-attack the Councillor that spawns, while the other shooter runs to the next plate. They should get there well in advance of the runner. The shooter that just meleed the Councillor gets in position for the plate after next.
- Repeat the last three steps until runners finish their lap and dunk their charges in the centre of the room. Then repeat the whole thing until there’s a charge for each player – that’s three perfect laps in total. If a runner dies, it’s not the end of the world – they’ll just need to be revived and you’ll need to run another lap.
- Runners should note that pieces of the floor will disappear on laps after the first, but don’t panic – if your shooters can deliver you a charge at every grid, you’ll have more than enough time. Warlocks: don’t use Blink. Makes it harder.
- When you’ve got six charges in the centre, everyone grabs one and heads to the outer ring to attempt a lap. Grids are unlocked now and each has four orbs. Only three of you need to make it, but the death timer can still wipe you, so you can’t afford foranyoneto die more than 30 seconds away from the end of the run.
- Hence, the whole team should call for charges as they approach each grid, and anyone who doesn’t get one should take the easiest path through and call for the easiest orb in the next grid. Calls should go: “top left,” “dead centre,” or “bottom middle.” It’s possible for all six of you to make it with this method (we justbetthat’s the stipulation in Prestige mode), but that’s tough – you only need three of you to dunk in the middle less than 30 seconds from your first death.
- Note that pieces of the floor will fall awayduringthis lap, which can screw you.
- When three players finish a full lap, run to the middle and dunk your charges again. Job done. If anyone needs to be revived, dunk your orbsbeforegoing to pick them up – you can wipe while reviving someone, but as long as you’ve made three dunks, your win will be countedevenif you wipe.
There’s an alternate strategy in which the four shooters just take a plate each and stay there, shooting across the arena to help unlock one plate to their left or right as well as their own. That can work too.
Destiny 2 Gauntlet Prestige mode

There are three key differences in Prestige mode. First: runners will get the ‘proven worthy’ effect after finishing a lap, which means they can’t run it again. This means that you’ll need to rotate runners such that every member of the fireteam runs the Gauntlet at least once. Agree on this beforehand.
Secondly: two Psions will spawn after runners collect their orbs, not just one. You need to melee the first as before, but you can shoot the second. If you leave either alive, your team will wipe.
Finally, only three orbs will spawn in the grids during the final run. Agree beforehand who’s going to take an orb in the first grid, and who’s going to skip it and claim orbs in the second grid. Assuming you all get an orb between the first two grids, you should have enough time to make three dunks and claim the win.
Destiny 2 Gauntlet Challenge
The Gauntlet challenge stipulates that no player can stand onanyplate more than once. This requires the following changes to the strategy:
- Split into two teams of three. In each round, each team needs a runner, a shooter, and… er, let’s call them a ‘cycler’.
- Begin the Gauntlet by standing on the plates as normal (the encounter activiation doesn’t count).
- The cycler is now the only player allowed to stand on any plates this round.
- Clear adds as normal. When the runner enters the Gauntlet, the shooter and cycler should unlock the next gate by shooting the arrows, just like normal.
- The cycler needs to get onto the next plate promptly otherwise the runner can’t see which row to call. This means the shooter has to kill the Psion at each plate, which leaves them with the most running and probably the hardest job. Stand near the arrows, where the Psion spawns, to make this easier.
- Repeat until the runner finishes their run. You now need to change roles – all three players on each sub-team will need to be runner, cycler, and shooter once each. This way, no-one ever stands on a plate more than once.
- Obviously, there’s no room for error here – this needs to go flawlessly. The final run then proceeds as normal.
If this is the third encounter, there’s no need to visit the Castellum; you can go straight to Calus, though the corridor that leads there does have some more levers in it if you fancy a visit to the tunnels.
Leviathan raid stage 5: Calus
Note the four plates in the room, as Calus lounges on his throne. The encounter begins when you shoot the cup from his hands – he’ll send some adds at you, including some gold-bar Incendiors. When they’re dead, Calus will clap, and everyone is teleported to a weird nether plane with a giant projection of his face. The face will inhale, drawing players toward it – the purple barrier on the floor is your lifeline here as it stops you from getting sucked into oblivion, but it’s less than a foot tall, so youmuststay grounded. Your goal is to move the barrier toward the giant face.
To do this, you’ll need to send three players back to the throne room – they can return by grabbing the orbs just beyond the barrier. Four Councillor Psions have spawned in bubbles above the plates, each of whom is marked with a sigil. Players in the nether will notice that these sigils appear on the giant face’s forehead – each sees a different sigil. You must call them all out. This leaves one sigil that isnotcalled, and the Psion in the throne room withthatsigil must be killed to advance the barrier. If you’re too slow, the barrier disappears, and the players in the nether become chow for a giant purple head.
The nether team have other challenges. Normal Psions and floating Projection Psions spawn here, too, and they can both ruin your day – the former can send their psychic rifts at you, which will bounce you over the barrier when they detonate. Projections, if left, will blow themselves up and just wipe everyone. (Sniper rifles are a good choice of power weapon to bring down Projections quickly while still doing good DPS on Calus later.) Finally, when the barrier advances, you’re drawn irresistibly forward by Calus’s breath – this can pull you into a hole in the floor or up a ramp, which, again, will launch you over the barrier.
You need to avoid all of that while killing Psions and calling out the sigils. Assuming everything goes well, the barrier ends up in front of the giant face after four marked Councillors are killed. The face now starts spitting very damaging skulls. You need to shoot as many of these as possible, since they’ll determine the duration of the shield-busting Force of Will buff in the coming damage phase.
Back in the throne room, Calus’s hands start glowing. This means he’s charging a nuke that will wipe everyone – you need to take down his shield to stop him. As soon as you do so, Force of Will is applied and starts ticking, so wait until the whole team is back and ready for DPS.
You need to group up on one plate, so call one out and lay into Calus, targeting his face. When you see him raise his hand, he’s about to blow your plate up, so that’s the signal to jump off and regroup on a new plate. Repeat until you’ve exhausted all four, then do the whole thing over again.
You should be able to kill Calus in three damage phases, but it’s perfectly possible to get a fourth if you’re struggling. When his health is exhausted, he gets another shield, and will go for his nuke one more time. Bust that shield again to finish the fight.

Destiny 2 Calus strategy:
- Agree who’s staying in the nether and who’s going back to the throne room. Anyone good at killing adds, generating orbs, and staying alive should go back. Agree beforehand which orbs to take, so as not to waste time, and divide the Councillors’ plates between you – we suggest one player covers each side, and the third goes roaming according to need.
- Players in the nether should each agree on a lane – left, middle, and right – and a fixed order for calling out the sigils on Calus’s forehead, so they’re announced as quickly as possible.
- Shoot the cup from Calus’s hand to start the encounter. Kill adds until the team is teleported to the nether (this should happen soon after the Incendiors are down). If you need power ammo, you can kill the Councillorsbeforeyou’re teleported, for some free drops.
- The throne room team take their orbs. Stay near the back of the room to avoid Calus’s laser – there’s no need to go forward unless it’s to kill a Councillor (you need to melee them in their bubbles). If you see the air around you start glowing, Calus is dropping a bomb on you –movebefore it explodes, as it can one-shot you. He likes to do this just after you’ve killed a Councillor.
- The nether team get into their lanes. Check ahead to make sure you won’t hit a ramp or a hole when the barrier moves. When it comes to killing Psions, prioritise regular ones first, then Projections. If a Psion casts a rift at you, move laterally to avoid its detonation, or it’ll launch you over the barrier.
- The nether team call out the sigils in their agreed order.
- The throne room team kill the Councillor marked with the sigil that wasnotcalled. The purple barrier advances.
- Repeat the last two steps until Calus’s face starts spewing skulls. Kill as many as possible – they don’t have much health, so spraying with auto rifles and SMGs can work. We also recommend you gather all three players in a Stormcaller’s rift for three Arc Souls and thus, three extra attackers (seriously, this helped us a lot). Make it a healing rift if you’re struggling with the skulls’ damage. Some teams use Coldheart to hose down the skulls, but you should probably save its ammo to DPS Calus.
- The throne room team take out Calus’s shield before he nukes everyone, but ideally nottoolong before the nether team return.
- When the skulls finish, the nether team return to the throne room, and everyone groups on one of the plates to DPS Calus. Shoot his face.
- When Force of Will runs out, or Calus raises his hand to blow up the plate, get off it, and move on to the next. Repeat until all four are exhausted.
- Repeat the whole cycle until Calus is dead. When a third of his health bar goes, his crit spot is now the glowing hole in his stomach, so shoot it instead of his face.
Tips for the DPS phase: Nightstalker, Golden Gun with Celestial Nighthawk, Voidwalker with vortex perks, a full group of Rat Kings, sniper rifles, Merciless, Coldheart, and Sweet Business, buffed where possible with empowering rifts and rally barricades, are some of the best tactics. Rocket launchers are good but only if paired with a rally barricade – they’re too slow otherwise. The Warlock’s Lunafaction Boots add a reload perk to their rifts, which can fill in for rally barricades.
Destiny 2 Calus Prestige mode
 The key change in Prestige mode is that when a player in the throne room melees the designated Psion, they will be teleported into the Nether. A random player from the Nether will also be returned to the throne room to take their place.
This is arguably the least difficult Prestige mode in the whole raid. As long as everyone knows what to do in each room, there’s no reason it should even break your stride – just fill into the slot of the person you replaced.
Destiny 2 Calus Challenge
The Calus challenge stipulates that you need to activate all four plates at once during each damage phase, so no more cycling between them. We suggest putting two people on the front two plates, sharing empowering rifts and rally barricades if possible, and one on each of the rear two.
Obviously, this means shorter damage phases, so you might need one more than usual to bring Calus down. You might also consider putting four people in the Nether to try and get a bigger Force of Will stack (see above).
We’re not aware of an enrage mode, and one early run took us four phases, which should be sufficient even with this stipulation. Thus, all this Challenge really does is drag the fight out, not make it any more difficult – unless you’re struggling to trigger damage phases (by dying, for instance), you should be fine.
Congratulations on beating Destiny 2’s raid! There’s now a hole in the floor with a chest at the bottom of it. Go take a look. There’s quite a surprise waiting for you.
Where is Benedict 99-40?

This is probably the number one question on your mind if you’ve just finished your first raid. You’ll have gathered some Emperor Calus Tokens from your adventures in the Leviathan – their UI tip advises you to bring them to Benedict 99-40 to increase your reputation with the Emperor. The catch: unless you’ve completed the raid, you don’t know who that is.
Benedict 99-40 is the sweeper frame underneath Hawthorne in the Tower, near the New Monarchy faction house. You can’t speak with him unless you’ve beaten the raid, but you can go take a look. He works like any other faction vendor, dropping raid loot engrams (at very high power levels) with each rank. Like most other vendors, it takes 20 tokens to level him up.
Destiny 2 Raid Checkpoints and Underbelly

Go to the floor above the Cabal people-cannons that fire you up to the Castellum. Stand between their barrels (see image above). That dark space right ahead is the entrance to a labyrinthine network of tunnels, which encircle all the raid’s arenas, and grant access to each and every one of them. This enables you to skip the Castellum stage which you’ll otherwise have to complete to get back into the raid at your checkpoint.
The passages to each arena are marked with sigils – the Sun for the Royal Pools, the Hound for the Pleasure Gardens, the Axes for the Gauntlet, and the Chalice for Calus. The passages are still a pain to navigate, but with a bit of practice, they’re a much faster way to get back in after a break than the Castellum.
The tunnels are also where the raid’s secret chests are hidden. There are nine of these, whose keys drop randomly from each of the raid’s three main encounters.
To access the tunnels through these pipes, you’ll need to open the path. Jump down under the bridge where you spawn into the raid and look ahead – you should find a room with six switches. They must be flipped in a sequence to open the tunnels. Numbering the switches from left to right, this sequence is 1, 5, 3, 2, 4, 6. Assign every member of the team to a switch and call them out as they’re flipped: the switches will stay down if you’re doing it right.